Sunday, May 3, 2009

For Angela

I have a good friend, Angela who I just love to talk about projects with. This evening, while I was working, I had to tell her about the fun things I was working on. So, here they are. I had so much fun with Joy's skirt last year, that I decided to make a couple for myself to just kick around in. I would take a picture with them on, but I am afraid my legs aren't much darker than the cream of the fabric, and I am not so sure that it would really show the skirts to their best advantage!

I got fabric to do two skirts, but I decided to use the leftover scraps to do a patchwork skirt. Hence this one. If you want to try it, I found the skirt instructions at Just Tutes.

I also found a pattern for pin cushion chickens, and they are my new favorite thing to make. Here is the one I worked on tonight.

Tuesday, March 24, 2009

Dustjacket Placemats

One of my very favorite origial ideas is dustjacket placemats. I love getting new books, but I always feel bad about the dustjacket. I mean, what are you really supposed to do with the dustjacket on that book? I have a hard enough time trying to get my kids not to rip the pages of the book, the dustjacket is history. So for years, when I have gotten a new book, I have taken the jacket off and put it in a file. Then, inspiration hit! And here is my great idea -

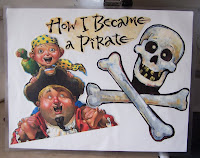
To make a dustjacket placemat, collect a piece of posterboard, clear contact paper, a pair of scissors, and a gluestick (if you really want).
Cut your posterboard into quarters, and this gives you the perfect size for a placemat. Now, you get to hack up your dustjacket. Look all over for pictures, not just on the front and back. I also like to cut out the little book blurb, but I don't always use it. Cut them out however you like. I'm not a big cut-on-the-line kind of girl, so I give about a quarter inch edge around them.
Now, assemble all your cut-outs and arrange. If you want, use your glue stick to tack them in place. However, you will be covering the whole mess in contact paper, so there is no real need.
Finally, cover the whole thing with clear contact paper. I always cut more contact paper than I need, much better have room for error than end up with not enough. I cut my pieces 15.5" tall and the just used the width of the contact paper. I tried to take a picture of the process, but I was having a hard time just getting the stuff on straight.
When you get that done, you have two options. You can just flip it over and repeat the contact paper on the blank side, or you can put more pictures on and make it double-sided. I always make them double-sided.
Lastly, trim your edges down to 3/8th of an inch. That's what it says to do on the contact paper directions, so that's what I do. And, viola! Dustjacket placemats. Here are some others that I have done to give you an idea of possible layouts.

Tuesday, March 17, 2009

Bows with Panache

As you have probably figured out, I am a bit obsessive. When I do something, I want to do a MILLION! I tell myself that I am just a real artist, and I want to work on something until I get it right. Not surprisingly, after doing my St. Patty's korker bows, I wanted to do some more. Fortunately for me, I have a lot of ribbon just sitting around, so I had plenty of material to work with. So, I tried using a bunch of different ribbons, and here is what I came up with.
What's that you say? You would really like to seem them closer up so you get all the details? Oh, well, if you insist.
What's that? How do they actually look in someones hair? Well, Joy is usually willing to model for anything.
Alright, I know you are just being polite, so I won't subject you to anymore pictures. Just the commentary.
I figured out why people don't generally use satin ribbon. It curls just fine, but it is heavy, so the curls tend to pull out. I will only use them as filler, and make them shorter. Otherwise they just stretch out too long. I really like how grosgrain holds its exact shape, as does the sheer ribbon I have tried. Overall, I like bows with lots of different kinds of ribbon, not just different colors. It gives them more texture.

Tuesday, March 3, 2009

Recycled Crayons

What do you do with all those broken crayons? Turn them into a fun craft project, of course. Although, I will say, I think I had as much or more fun than the kids did on this one. I actually started breaking apart only slightly used crayons to make these. (True, I always stock up at the beginning of the school year, but that is beside the point.)

To make, cut the wrapper off your crayon - I recommend a slit down the side with a box cutter versus tearing the paper off manually - and break the crayon into pieces. Then, put the broken pieces into a muffin pan.

You can use a regular muffin pan, but I found that those end up so big they are hard to use. Instead, I use a mini-muffin pan. I had a friend who used a mini-donut pan, and those looked really cool, but I don't have one. In these pictures, I actually lined the pans with foil, but it was a real pain, and since we don't use the mini-muffin pans for muffins, I did the next batch with no foil. (Maybe a trip to the thrift store is on the horizon.) Bake your crayon bits at 300 degrees. Your time required depends on the number of crayons and size of the muffin pan. With the mini I started checking at 5 minutes. The ones that weren't as full were definitely entirely melted, but the more full ones weren't done yet. You need to balance and not over cook because over-cooking (aside from smelling really melty) seems to separate the color from the wax and produce uneven color distribution in the crayon. When the crayons are just melted, remove from oven. I dragged a toothpick around the top of the crayon soup to give them a marbled look, but it doesn't really effect anything but the top layer.

Then, I popped them in the freezer to set. When they were hard, I rocked the edges of the pan back and forth (like an ice-cube tray) and whacked them upside down on the counter. They came out pretty smoothly.

The pan is no longer food-friendly, but we have cute crayons. They work really well for covering large areas, but not for detail coloring. Also, have fun putting different color combinations together, I am always surprised at what comes out nicely and what looks gross. Oh, don't stir when they come out of the oven unless you are hoping to blend into one solid color.

St. Patty's Korker Bows

I love St. Patrick's Day! Don't ask me why, but I just love it. Every year I look for some new craft to celebrate with. Lately, I have been into hair

bows. I like korker bows, but I haven't done them before. When I looked up instructions, usually they say to use grosgrain ribbon. Well, grosgrain is more expensive, and I don't have just yards of it laying around. (Okay, I do, but that is beside the point. That ribbon already has plans in place.) But, I do have TONS of satin and other ribbon that I don't really have plans for. So, I decided to put it to use. TA DA! Korker bows. Apparently, you can use many different types of ribbon. The instructions I used came from Girly Things. They recommend using Fray Check or clear nail polish on the ends, but I am a pyro, so I prefer to use an open flame. Although, curly as they were, I might try the nail polish next time. Anway, they turned out pretty cute. I used two different width ribbons, and I liked the effect. I am excited to try other ribbon types and see how they work too. Oh yes, for this type ribbon, I baked them for 25min at 275.

Sunday, March 1, 2009

Mystery Quilt

So, I tried the "Turning Twenty...Again" pattern, and wasn't entirely happy with the resutls. As you can see, I still haven't put on a border or back, hopefully that will help. The colors just didn't turn out the way I had hoped. I wasn't going to put two of the greens, the orange, or the teal in, but I added them to make a bigger quilt. Next time, I will go for the smaller but definately better quilt.

Wednesday, January 7, 2009

Meow


The other project I have worked on recently is this cute cat. I had scraps left from a jumper outfit I made for Joy for Christmas, and decided to make her a cat neck-pillow from them for her birthday. The rounded body goes around the neck and, viola! A perfect neck pillow. I love the fancy flannel. I made one several years ago out of the recommended solid polar fleece, and it looked fine, but not really nearly as fun. I am thinking about doing these for the boys for their birthdays. There is a monkey, lion and dog on the pattern as well, so that would be enough for each boy. I don't think I will be able to find such great fabric multiple times, but maybe I will get lucky.

Christmas Quilts

I was talking to a friend the other day, and her husband asked if I had been doing anything crafty lately. Besides being taken a little aback at the question from such a surprising request, I also realized that I was feeling that I hadn't been doing anything crafty lately. Then I remembered, "Oh yeah! Christmas!" I have been crafting, just with focused and energetic zeal. I did quilts for Paul and Brigham. And, they were a lot of fun.

This one is Paul's, and is made from the Bento Box pattern. The top is made from old denims collected over the years.


This one for Brigham is the Rail-Fence pattern. At least, I think that is what it is. After eyeballing quilts of this make at several friend's homes, I started to covet it. After it was described to me, I decided to try it out. I made a small change. Instead of doing all the patches as three-piece patches, I cut the back pockets out of some of the jeans used them as patches. I thought it turned out rather nicely and gave it a real look.

This is the back of the Rail-Fence quilt. I figure footballs should last a lifetime. He won't outgrow them, I mean.